ComfyUI: Install on Windows, First Image & Requirements
ComfyUI is free node-based software for generating AI images and video locally. We show you how to install it on Windows and create your first image.

👁 122 reads
ComfyUI is free software for generating AI images and video on your own computer. Instead of a single text box for prompts, you get a canvas with connected blocks. We used this program for all our local tests from September 26, 2026: Z-Image Turbo, Qwen-Image 2.1, and video with Wan 2.2 on an RTX 4090 card. Below you’ll find installation on Windows, your first image, and the things that took us the most time.
Quick Summary
ComfyUI is free, works offline, and supports practically every open image and video model, usually on launch day. Beginners should start with the Comfy Desktop app or the Portable version for Nvidia cards. Your first model is best taken from the built-in templates, as they suggest which files to download. On an RTX 4090, a 1344×768 image with Z-Image Turbo took 4.2 seconds. Most time goes to downloading files (18-21 GB per model) and the first load.
How ComfyUI Differs from Regular Generators
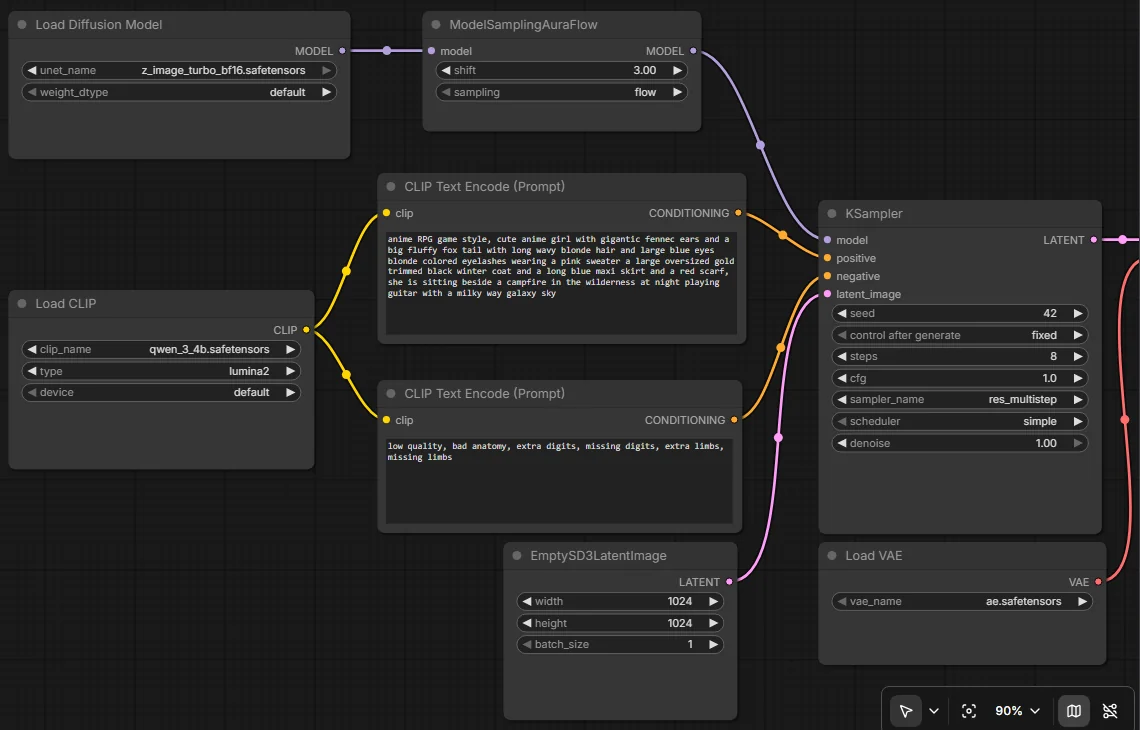
In ComfyUI, each generation step is a separate block (node): loading the model, converting the prompt to vectors, sampling, decoding the image, saving. You connect blocks with lines. Such a set is called a workflow, and you can save it, send it to someone, or load it from an image, because ComfyUI saves it in PNG file metadata.
At first glance, it looks difficult. However, you gain access to new models immediately after release, full control over every setting, and the ability to control everything from a script. All our tests went through the API, without clicking.
Installing on Windows: Three Routes
| Method | For Whom | Card |
|---|---|---|
| Comfy Desktop | beginners, installer like a regular program | Nvidia or AMD (recommended) |
| ComfyUI Portable | those who want everything in one folder, no installation | Nvidia or CPU only |
| Manual installation (git + Python) | those who want to control via API and scripts | Nvidia, AMD, Intel, Apple |
According to the ComfyUI documentation, the Portable version includes Python 3.13 and PyTorch with CUDA 13.0, and on Nvidia cards from the 20 series onward, PyTorch version cu130 or newer is required. We use manual installation. We described it step by step in the Qwen-Image 2.1 installation guide, because we started with that model. In short, it looks like this:
- Download the code:
git clone https://github.com/comfyanonymous/ComfyUI. - Create an environment:
python -m venv venv, then install PyTorch with CUDA from pytorch.org, and finallypip install -r requirements.txt. - Run:
venvScriptspython main.pyand openhttp://127.0.0.1:8188in your browser.
Program startup took us 6 minutes, but during that time the same disk was downloading dozens of gigabytes of models. A fresh installation on an unloaded disk started in 31 seconds.
First Image: Template Instead of Blank Canvas
The simplest route is the Templates menu on the left bar. You choose a model template (e.g., Z-Image Turbo, Qwen-Image, or Wan 2.2), and ComfyUI shows which files are missing and where to download them from. Files go into models subfolders:
models/diffusion_models- main model (e.g.,z_image_turbo_bf16.safetensors, 12.3 GB),models/text_encoders- text encoder (e.g.,qwen_3_4b.safetensors, 8.0 GB),models/vae- image decoder (e.g.,ae.safetensors, 0.3 GB).
Then you enter a prompt in the text block and click Run. Generating the first image after startup takes the longest, because the model loads into the card’s memory (over 6 minutes for us with a busy disk). Subsequent images with Z-Image Turbo took 4.0-4.5 seconds. We show a gallery of 16 images from this test in the Z-Image Turbo vs Qwen-Image 2.1 article.
Hardware Requirements
| Model | Files | Card Memory in Our Test | Time on RTX 4090 |
|---|---|---|---|
| Z-Image Turbo (images, Apache 2.0) | 20.7 GB | up to 18.2 GB | 4.2 s / 1344×768 image |
| Qwen-Image 2.1 int8 (images, non-commercial license) | 17.3 GB | up to 16.0 GB | 6.5 s / image |
| Wan 2.2 TI2V 5B (video, Apache 2.0) | 18.1 GB | approx. 20 GB | approx. 4 min / 5 s clip |
ComfyUI keeps everything on the card that will fit, so these numbers are the upper limit, not the minimum. On cards with 8-12 GB, the program moves part of the model to RAM and runs slower. In that case, look for quantized versions (fp8, GGUF). With local AI, card memory matters most, which we explain in the article what computer for local AI.
Script Control
You can save any workflow in API format (option “Save (API Format)”) and send it to the server from Python. The server accepts it at http://127.0.0.1:8188/prompt, and shows finished files at /history/<id>. This is how we made a series of 8 images in two models and 4 video clips with time and memory measurements. The /free command is also useful, which frees card memory before the next model.
What to Watch Out For
- Model licenses vary. Z-Image Turbo and Wan 2.2 are Apache 2.0, but Qwen-Image 2.1 has a research license that prohibits commercial use. Check the model card on Hugging Face before using images in work.
- Add-ons (custom nodes) are third-party code. Only install popular, updated extensions. Each runs with full permissions on your computer.
- Non-English characters in images. In our test (we ran the writing tasks in Polish, a heavily inflected language), neither Z-Image nor Qwen-Image correctly rendered Polish text. Add non-English text in a graphics editor.
Ready Script: ComfyUI with Models in One Command
We wrapped manual installation in a PowerShell script for Nvidia cards. It checks for git, Python 3.13, and the card, downloads ComfyUI, and installs PyTorch with CUDA in the right order. This is important: if you install ComfyUI libraries before PyTorch, pip can install a version without card support. Finally, the script downloads selected models to the proper folders. We tested it on September 26, 2026, in a clean folder. Installation ended with the message “PyTorch: 2.14.0+cu132 True,” and fresh ComfyUI started in 31 seconds. You can run the script multiple times: it skips steps already done and resumes interrupted model downloads.
- Download: install-comfyui.ps1 (6 KB) or all 5 scripts in one ZIP file (15 KB).
- Run:
powershell -ExecutionPolicy Bypass -File .instaluj-comfyui.ps1(default with Z-Image Turbo). - Images and video together:
-Modele zimage,wan, without models:-Modele brak, different folder:-Folder D:AIComfyUI. - Images without clicking, in batches from a prompt list: generuj-obrazy.py (6 KB), description in the Z-Image Turbo article. Video: generuj-wideo.py (6 KB), description at Wan 2.2.
Before you run any script from the internet, read it. It runs with your permissions. That’s why the full code is below, unshortened, with comments. The scripts are under MIT license: you can modify and use them in business too.
# instaluj-comfyui.ps1 - ComfyUI on Windows with Nvidia card + models from tests (quantslant.com/comfyui-install-windows-requirements/)
# Author: Piotr Olszewski, quantslant.com. Script license: MIT. Tested September 26, 2026: Windows 11, RTX 4090, Python 3.13.
#
# What it does (each step skips if already done, so you can run the script multiple times):
#  1. Checks for git, Python 3.13 (or 3.12), and Nvidia card.
#  2. Downloads ComfyUI from GitHub and creates a separate Python environment (venv).
#  3. Installs PyTorch with CUDA BEFORE other libraries - different order can install a version without GPU support.
#  4. Optionally downloads models to proper folders: Z-Image Turbo (images, 20.7 GB) and Wan 2.2 5B (video, 18.1 GB).
#  5. Creates start-comfyui.bat. Interface: http://127.0.0.1:8188
#
# Usage (PowerShell):
#   powershell -ExecutionPolicy Bypass -File .instaluj-comfyui.ps1
#   powershell -ExecutionPolicy Bypass -File .instaluj-comfyui.ps1 -Folder D:AIComfyUI -Modele zimage,wan
#   powershell -ExecutionPolicy Bypass -File .instaluj-comfyui.ps1 -Modele brak

param(
    [string]$Folder = "$env:USERPROFILEAIComfyUI",
    [string[]]$Modele = @('zimage'),
    [string]$Cuda = 'cu132'
)

$ErrorActionPreference = 'Stop'
$ProgressPreference = 'SilentlyContinue'
function Info($t) { Write-Host "[ComfyUI] $t" -ForegroundColor Cyan }
function Uruchom([string]$exe, [string[]]$argumenty) {
    # programs write progress to stderr - we don't treat that as an error, exit code matters
    $ErrorActionPreference = 'Continue'
    & $exe @argumenty 2>&1 | ForEach-Object { "$_" } | Where-Object { $_ -match '^Successfully|ERROR|error:|^Cloning' } | ForEach-Object { Write-Host "   $_" }
    $kod = $LASTEXITCODE
    $ErrorActionPreference = 'Stop'
    if ($kod -ne 0) { throw "Command $exe ended with code $kod" }
}

# 1. Requirements
if (-not (Get-Command git -ErrorAction SilentlyContinue)) { throw 'Git not found. Install: winget install Git.Git, then open a new PowerShell window.' }
$py = $null
foreach ($v in @('3.13', '3.12')) {
    try { $ErrorActionPreference = 'Continue'; $out = & py "-$v" --version 2>&1; $ErrorActionPreference = 'Stop'; if ($LASTEXITCODE -eq 0) { $py = @('py', "-$v"); Info "Python: $out"; break } } catch { $ErrorActionPreference = 'Stop' }
}
if (-not $py) { throw 'Python 3.13 or 3.12 not found. Install: winget install Python.Python.3.13' }
try { $gpu = & nvidia-smi --query-gpu=name,memory.total --format=csv,noheader 2>$null } catch { $gpu = $null }
if (-not $gpu) { throw 'Nvidia card not detected (nvidia-smi). This script is for Nvidia cards - for AMD use Comfy Desktop.' }
Info "Card: $gpu"

# 2. Code and environment
if (-not (Test-Path (Join-Path $Folder 'main.py'))) {
    Info 'Downloading ComfyUI from GitHub...'
    Uruchom 'git' @('clone', '--depth', '1', 'https://github.com/comfyanonymous/ComfyUI.git', $Folder)
} else { Info 'ComfyUI already present - skipping download.' }
$vpy = Join-Path $Folder 'venvScriptspython.exe'
if (-not (Test-Path $vpy)) {
    Info 'Creating Python environment (venv)...'
    Uruchom $py[0] @($py[1], '-m', 'venv', (Join-Path $Folder 'venv'))
}

# 3. PyTorch with CUDA, then the rest
$maCuda = $false
try { $ErrorActionPreference = 'Continue'; $t = & $vpy -c "import torch;print(torch.cuda.is_available())" 2>$null; $ErrorActionPreference = 'Stop'; $maCuda = ($t -eq 'True') } catch { $ErrorActionPreference = 'Stop' }
if (-not $maCuda) {
    Info "Installing PyTorch with CUDA ($Cuda, approx. 3 GB)..."
    Uruchom $vpy @('-m', 'pip', 'install', '--upgrade', 'pip')
    Uruchom $vpy @('-m', 'pip', 'install', 'torch', 'torchvision', '--index-url', "https://download.pytorch.org/whl/$Cuda")
}
Info 'Installing ComfyUI libraries...'
Uruchom $vpy @('-m', 'pip', 'install', '-r', (Join-Path $Folder 'requirements.txt'))
$ErrorActionPreference = 'Continue'
$t = & $vpy -c "import torch;print(torch.__version__, torch.cuda.is_available())" 2>$null
$ErrorActionPreference = 'Stop'
Info "PyTorch: $t"
if ($t -notmatch 'True') { throw 'PyTorch does not see the card. Update Nvidia driver or try -Cuda cu130.' }

# 4. Models
$pliki = @{
    'zimage' = @(
        @('diffusion_models', 'https://huggingface.co/Comfy-Org/z_image_turbo/resolve/main/split_files/diffusion_models/z_image_turbo_bf16.safetensors'),
        @('text_encoders', 'https://huggingface.co/Comfy-Org/z_image_turbo/resolve/main/split_files/text_encoders/qwen_3_4b.safetensors'),
        @('vae', 'https://huggingface.co/Comfy-Org/z_image_turbo/resolve/main/split_files/vae/ae.safetensors'))
    'wan' = @(
        @('diffusion_models', 'https://huggingface.co/Comfy-Org/Wan_2.2_ComfyUI_Repackaged/resolve/main/split_files/diffusion_models/wan2.2_ti2v_5B_fp16.safetensors'),
        @('text_encoders', 'https://huggingface.co/Comfy-Org/Wan_2.2_ComfyUI_Repackaged/resolve/main/split_files/text_encoders/umt5_xxl_fp8_e4m3fn_scaled.safetensors'),
        @('vae', 'https://huggingface.co/Comfy-Org/Wan_2.2_ComfyUI_Repackaged/resolve/main/split_files/vae/wan2.2_vae.safetensors'))
}
foreach ($m in $Modele) {
    if ($m -eq 'brak') { continue }
    if (-not $pliki.ContainsKey($m)) { Write-Warning "Unknown model: $m (available: zimage, wan, brak)"; continue }
    foreach ($p in $pliki[$m]) {
        $cel = Join-Path $Folder "models$($p[0])$(Split-Path $p[1] -Leaf)"
        if (Test-Path $cel) { Info "Present: $(Split-Path $cel -Leaf)"; continue }
        Info "Downloading $(Split-Path $cel -Leaf) (interrupted download will resume on rerun)..."
        $ErrorActionPreference = 'Continue'
        & curl.exe -L -C - --fail -o "$cel.czesc" $p[1]
        $kod = $LASTEXITCODE; $ErrorActionPreference = 'Stop'
        if ($kod -ne 0) { throw "Download of $cel failed - run script again." }
        Move-Item "$cel.czesc" $cel
    }
}

# 5. Start
$bat = Join-Path $Folder 'start-comfyui.bat'
Set-Content -Path $bat -Encoding ASCII -Value @('@echo off', 'cd /d "%~dp0"', 'echo ComfyUI: http://127.0.0.1:8188  (close window to stop)', 'venvScriptspython.exe main.py --listen 127.0.0.1 --port 8188')
Info "Done. Run $bat and open http://127.0.0.1:8188 (first start takes longer)."
See also: Wan AI: all versions, prices, and our video tests · Wan 3.0 vs Wan 2.2 on the same prompts
Frequently Asked Questions
Is ComfyUI free?
Yes. ComfyUI is open-source software under GPL-3.0 license, works without an account and without internet after downloading models. Only optional API nodes that send tasks to cloud models are paid.
What graphics card for ComfyUI?
Best is Nvidia with at least 12 GB of memory. In our test, Z-Image Turbo used up to 18 GB on RTX 4090, and video with Wan 2.2 about 20 GB. On smaller cards it runs slower or requires quantized versions.
ComfyUI or Stable Diffusion WebUI?
ComfyUI gets support for new models faster and lets you control everything from a script. Simpler interfaces with a single window are easier to start with, but usually support new features later. More about Stable Diffusion itself is in the Stable Diffusion article.
Does ComfyUI work on Mac?
Yes, through manual installation or Comfy Desktop on Macs with Apple processors. We did not measure generation times on Mac.
Sources and Date Checked
Our own test September 26, 2026
- ComfyUI 0.37
- RTX 4090 24 GB
- Windows 11. Requirements and installation methods: docs.comfy.org. Code and license: GitHub ComfyUI. Checked September 26
- 2026



More on this from QUANTSLANT

 news·AI Updates October 2026: Release Dates & PredictionsOctober 2026 AI releases: Kling 4.0, Claude Haiku 5.5, likely Gemini 4 Pro, iPhone Duo launch, ChatGPT Pro 200 limit cuts - dates and probability ratings.